 Redux、React-Redux入门笔记
# 一、开头
Redux 是 JavaScript 状态容器,提供可预测化的状态管理。它已经事实上的成为了react的状态管理工具。本篇文章我将会用一个计数器的小例子来演示一下Redux开发的流程,由于水平有限,部分内容可能讲的不是很清楚,还望大家批评指正,仓库地址:https://gitee.com/cyh199910/redux-api.git,可以边看代码边理解。
# 二、使用的工具
VScode
create-react-app
2
# 三、创建react项目
使用create-react-app来创建项目
npx create-react-app my-app
cd my-app
yarn start
2
3
# 3.1、安装相关依赖
yarn add redux react-redux
确保项目依赖有这些库
# 3.2、配置redux
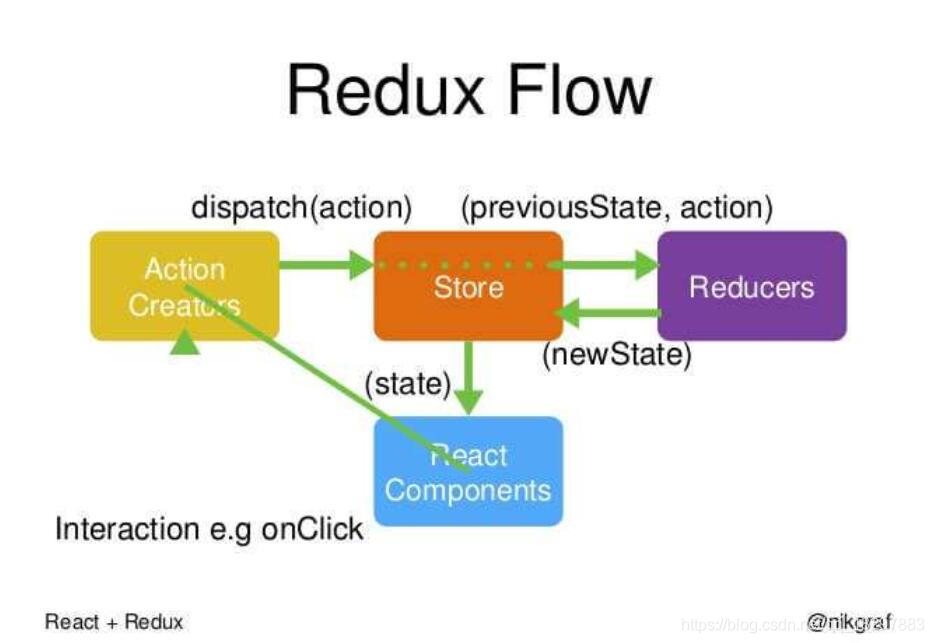
Redux的流程是单向数据流,即当页面渲染完成后,UI就已经出现,用户触发了(dispatch)UI上的一些action,action将被送到一个叫Reducer的方法里面去,Reducer将会更新Store,Store中包含state。
我们先来做一个十分经典的计数器的案例,点击按钮数字加一。从上面的图我们可以看到,redux的数据流需要store\action\reducer这三个板块,我们首先在src文件夹下新建redux文件夹,新建store.js、reducer.js、action.js:
首先定义reducer.js,它有点像一个指挥中心,根据传进来的类型分配任务。它负责接收组件传递的action,根据action的类型来进行数据的修改,函数接收两个参数,第一个state为store存储的状态,可以给它赋初始值,第二个为action(动作),action是一个对象,可以传递type和其他的值进去,我们可以在后面的action.js中看到它的具体参数,函数中使用switch来分别对action的不同type来进行数据的处理,我们需要实现计数器的加法:
在reducer.js中填写代码:
const counter = (state={count:0},action) =>{
    switch(action.type){
        case "increase":
            state.count=state.count+1
            return {...state}
        default:
            return state
    }
}

export default counter;
2
3
4
5
6
7
8
9
10
11
store.js接收reducer的导出为参数并使用redux提供的createStore方法创建一个数据源store,在store.js中写代码:
import { createStore } from "redux";
import reducer from "./reducer";

export const store = createStore(reducer);
2
3
4
action.js中定义一些方法用于UI组件的动作分发(dispatch),这里的type其实就是对应reducer的action.type:
export const action = {
  //加法
  increaseAction: { type: "increase" },
};
2
3
4
在index.js中我们接收store对象,并使用Provider组件包裹App组件,Provider是从react-redux获得的,用于持续的监听组件中的数据流
import React from "react";
import ReactDOM from "react-dom";
import App from "./App";
import { Provider } from "react-redux";
import { store } from "./redux/store";

ReactDOM.render(
  <Provider store={store}>
    <App />
  </Provider>,
  document.getElementById("root")
);
2
3
4
5
6
7
8
9
10
11
12
13
# 3.2、编写UI
我们简单一点,直接在App.js上进行修改,我们定义了一个函数组件,其中有一个span用于展示数据,还有一个button按钮来进行加一操作,如果不用redux的话我们通常会在组件中定义状态和方法,并进行绑定调用,但是我们使用redux的话,需要的方法和状态就可以交由redux处理并以props的形式传入,我们先看代码:
import React from "react";
import { action } from "./redux/action";
import { connect } from "react-redux";

function Counter(props) {
  const { value,onIncreaseClick } = props;
  return (
    <div>
      <span>计数器计数{value}次</span>
      <button onClick={onIncreaseClick}>+1</button>
    </div>
  );
}

const mapStateToProps = (state) => {
  console.log(state);

  return {
    value: state.counter.count,
  };
};

const mapDispatchToProps = (dispatch) => {
  return {
    onIncreaseClick: () => dispatch(action.increaseAction)
};

const App = connect(mapStateToProps, mapDispatchToProps)(Counter);

export default App;
2
3
4
5
6
7
8
9
10
11
12
13
14
15
16
17
18
19
20
21
22
23
24
25
26
27
28
29
30
31
其中需要了解几个关键字:
connect(),它是一个高阶函数,两个参数都是函数,mapStateToProps函数用于将存储在redux中的状态传递给组件,mapDispatchToProps函数则是传递一个派发动作,dispatch方法中接收一个对象,其中包含派发动作Action的类型和你想传递的参数,在这个例子中我们只需要传递type即可,这里可能有一点不好理解,建议将代码多看几遍。action.increaseAction来自action.js导出的数据。connect()最后将Counter组件包裹后生成一个新的组件App,并将其导出,完成了这些操作,组件的props中就拥有了传递进来的状态和方法,使用props.xxx即可调用。
我们来看看效果:
运行yarn start
# 四、总结
这只是个简单的案例,展示redux的流程,更详细的案例可以查看redux的官网。